Hummus

Before everyone freaks out and says “Hummus?!  That has BEANS, Dr. Angela!”  I am very aware that hummus uses beans.  I am not opposed to beans in the diet if someone prepares them correctly.  This takes time, forethought, and is definitely NOT convenient.  When I recommend foods for someone’s diet, it is all about getting adequate nutrients while eliminating toxins (and making it work for their lifestyle).  I can’t tell you how many times I hear “Dr. A, I just need my food to be convenient!”  That is why I typically eliminate food categories where the preparation is extensive in order for them to be nutrient dense and free of toxicity.  Beans are one of those categories due to phytic acid.  If you do not soak your beans in an acidic environment prior to cooking them, they may not be the healthiest option.  That means, in order to make them a healthy option, you have to do something inconvenient.

I made this hummus to prove this very point.  If you want hummus, you can’t buy store bought versions without additives and bad oils, so there’s no convenient option unless you have a friend willing to make it for you!  This would be an example of how to make hummus and have it be a healthy addition to your diet.  Since I have the luxury of getting those same nutrients in more convenient options, this is not something I do regularly.  However, sometimes I get a wild hair and decide to make something labor (or at least time) intensive!

Hummus

Ingedients:

  • 2 cups cooked garbanzo beans (cooking instructions below)
  • 2 cloves garlic
  • juice from half a lemon
  • 2-4 tbsp tahini (or any nut butter)
  • 1-2 tsp cumin
  • handful parsley
  • EVOO
  • salt and pepper

Directions:

For the beans, soak a bag of dried chickpeas in warm water with a couple Tbsp of lemon juice, vinegar, or some other acidic liquid.  Leave for at least 24 hours before rinsing and boiling in water on the stovetop for 6-8 hours.  Add more water along the way if it is evaporating.  Once cooked, you can drain them and use them for hummus!

Place 2 cups of  garbanzo beans in the food processor with tahini, garlic, parsley, lemon juice, salt and pepper.  Pulse until crushed up and then turn on the processor and let it go while you are drizzling olive oil in the top shoot.  You will know you have enough olive oil when the mixture is creamy, like hummus!

For the rest of the beans, place them in freezer safe containers and freeze them for later use!


Blueberry Fruit Rollups

Blueberry season is transitioning into apple season, but that doesn’t mean I didn’t stock up on my favorite variety of blueberries!  I have a dehydrator that I don’t use that often and have always wanted to attempt fruit leather.  This year, I finally got around to it, and it was super easy.  I don’t usually snack that much, but if you have kids, this could be a really fun project and snack idea for them to participate in and enjoy the fruits of their labor!

You could use any fruit puree really, including any applesauce you may create from apple season!

Blueberry Fruit Rollup

Ingredients

  • 1 lb thawed blueberries
  • Juice from half a lemon
  • Tbsp of honey

Directions:

Puree all the ingredients in a blender and spread over a parchment paper-lined dehydrator tray or baking sheet if you do this in the oven.  Follow your dehydrator instructions. My dehydrator I used at 115F for 8 hours.  If you use the oven, place it at 170F and bake for 6-7 hours until it isn’t sticky when you touch it.  Roll it up, and enjoy!


Granola

Ingredients:

  • 1 cup sliced almonds or pumpkin seeds
  • 1/2 cup pecans, chopped
  • 1/2 cup walnuts, chopped
  • 1/2 cup unsweetened, shredded coconut (I wouldn’t leave this out because the spices really adhere to it!…but would be fine without)
  • 1/4 cup coconut oil, melted
  • 1/4 cup raw honey
  • 1 tsp salt (please keep the salt!  I love the salty/sweet effect!)
  • 1 tbsp cinnamon

1. Preheat oven to 300 degrees.

2. Mix all the ingredients together.

3. Put on a baking sheet lined with aluminum or a silpat, etc.

4. Bake for 20-25 minutes, stirring occasionally

5. Let cool.


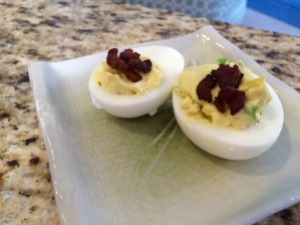
Game Day Paleo Deviled Eggs

FullSizeRender (15)IMG_0244

Sometimes party food (especially on game day) can lack a little protein.  Don’t let that be the case at YOUR party!  I think deviled eggs are disgusting, but it was on Chris’ “must have” list at the Friendsgiving a couple months ago.  So we all took part in making homemade mayo (which I had never been successful at) and making those little devils happen.  I have to admit….I had so many of these things.  They were amazing!  Addicting!  That means make a double batch.

Side note: I have tried homemade mayo several times with disastrous results!  Meaning: all over the cupboard from trying to drip the oil so slow that it shoots out the top of the processer! I swore off homemade mayo especially because I don’t even like it!  However, this was the easiest thing ever and turned out amazing! Thanks to Nom Nom Paleo!  The cookbook is amazing and should be a staple for everyone! Normally, I do my own take on people’s food because everyone has their own set of preferences, but these are perfect the way they are, and if I were you, I would not change a thing!

Mayo:

  • 1 cup avocado oil
  • 1 egg yolk
  • 1 Tbsp lemon juice
  • 1 tsp dijon mustard
  • 1 Tbsp water

Put everything in the bottom of an immersion blender cup, putting the oil in last. Place the immersion blender in the bottom and pulse.  As it starts to emulsify, start to lift and tilt the head as the mayo forms.  Season with salt to taste.

Deviled Eggs:

  • 12 hard boiled eggs
  • 1/2 cup mayo
  • 2 green onions, thinly sliced
  • 1 1/2 tsp Dijon mustard
  • 1 tsp white vinegar
  • salt and pepper
  • 1/2 cup crispy bacon pieces (aka lardons)

Directions:

Mix the egg yolks with the mayo, then add the green onion, mustard, vinegar, salt and pepper.  Scoop the mixture into the egg whites and top with crispy bacon pieces!  To me, the bacon is essential.  I think it breaks up the soft mushy texture that I don’t appreciate from a deviled egg and adds just the right kick of flavor.


Banana Pancakes

IMG_0107

How do you spend your first morning home after listening to 20+ hours of lecture?  With banana pancakes that you cooked in the ghee you brought back, topped with pure maple syrup, and drinking a cup of your favorite Redband Coffee.  That’s how.  Mmmm.

Banana Pancakes

Ingredients:

  • 1 ripe banana
  • 1 cup coconut milk
  • 1/2 cup coconut flour
  • 1/2 cup tapioca flour
  • 1 tsp baking soda
  • 1 tsp baking powder
  • 2 eggs
  • 1 tsp vanilla
  • 1 tsp cinnamon

Directions: Preheat griddle to 325 and throw some ghee on there (or coconut oil).  Mix all the ingredients together and mash in the banana.  Ladle pancake batter onto the griddle until browned and flip!  Eat…and save the leftovers for tomorrows grab-n-go breakfast!


Dessert via Campfire: Paleo Elvis Banana Boats

banana boats2
Campfires and smores go together. They do. However, trying to eat healthy means thinking twice about those graham crackers, marshmallows, and milk chocolate! I have taken the time to make homemade smores before with great success! However, I don’t know a single mom that has time to make homemade marshmallows and graham crackers before a camping trip. So, bring on the other options! I don’t know where this recipes originated but it is genius. Now let me take out all the bad ingredients and do it up right! Campfire banana boats!

Roasted Banana Boats

Ingredients:

  • bananas
  • aluminum foil
  • dark chocolate chips
  • nut butter (sunbutter is like peanut butter and that’s why these are “Elvis”)
  • ingredient ideas: chopped nuts, dried cranberries, almond butter, cashew butter, real butter!, homemade marshmallow fluff, coconut butter…)

Peel back a strip of banana peel from the concave side but keep it in tact. Make a slit lengthwise down the banana and pull apart slightly. Dollop in nut butter and top with chocolate chips. Gently push together and put back the strip of peel you opened. Wrap in aluminum foil, throw on the fire, and wait 8-10 minutes. Take off the fire and open the banana. Eat up!


2014 CSA Week 1! Kale Chips

kale chips

I was super excited to pick up my CSA 1/2 share last Friday. The beginning weeks are always full of greens, so I knew salad would be in my future. However, this begins the summer when I never have to go grocery shopping because I get so much produce that I can barely eat it all in time. This also means preserving time in the future!

CSA Bounty Week 1:

  • head of boston butterhead lettuce
  • head of another kind of lettuce
  • 1 bunch kale
  • 1 bunch radishes
  • 1 bag of sprouts (mustard, celery, etc.)
  • some mint
  • bag of arugula

Kale Chips

Preheat the oven to 350 degrees. Tear kale into pieces and spread the leaves on a baking sheet. Drizzle olive oil over the leaves. Bake until crisp…about 8-10 minutes. Sprinkle with salt and pepper. (If you salt prior to baking, for some reason they often become WAY too salty!) You can change up the flavor to anything you want! Garlic powder works great, nutritional yeast gives it a cheesy flavor, cayenne gives them a kick, etc.